Showing posts with label Ankle to Knee. Show all posts

Monday, October 19, 2015

Yoga for Runners

This article was first published in the magazine at activewearusa.com


Recently I have added sprint training to my workout regimen.  I am strongly attracted to the dynamic, all-out bursts of energy followed by short periods of rest. Sprinting requires careful warm-up to help prevent injury, and the following is my favorite sequence of yoga postures to warm up for running.


Supine Big Toe Balance with PNF technique (Supta Padangusthasana)

PNF (Proprioceptive Neuromuscular Facilitation) technique helps to release the hamstrings by first engaging them, then relaxing into the stretch.  Be gentle with this, do not force any stretch, as we are using this as a warmup.

To get into the posture: Lie on your back with both feet on the floor and knees in the air. Extend your right leg straight up from the hip, and loop a yoga strap around the ball of your right foot. Then, extend your left leg straight forward from the hip and press it down into the floor while keeping the right leg in place.


To add the PNF, press the right leg in a forward direction, like you are trying to bring the leg down to the floor, but resist with the strap so your leg doesn’t actually move toward the floor.  Hold the press for 5-10 seconds, then release the press and gently draw the leg closer to your torso to increase the stretch and hold for 3-5 deep breaths.  Do this three times.


After the PNF, bring the right directly on top of the hip, then move the leg to your right about 12 inches; if the leg were a clock, you would be moving toward 1 o’clock.  Then draw the leg into the stretch again, this time targeting the inner part of the hamstring, and hold for 3-5 deep breaths.


Bring the right leg back to center, then toward the inside so it hovers above your left hip bone, or 11 o’clock.  Draw the leg into the stretch again, releasing the outer hamstring and possibly the IT band.  Hold for 3-5 deep breaths.


Repeat the sequence on the left leg.


Bound Angle Pose (Baddka Konasana)

A nice release for the groins, this stretch is especially good if you tend to run with knees turned in or run mostly on the inside arches of your feet.

To get into the posture: Sit on the floor, or on a blanket(s) if your hips or groins are tight. Bring the soles of your feet together as close to your pelvis as you can get comfortably.  Gently engage the outer hip muscles to press the knees down toward the floor.  If you are already feeling a deep stretch, stay upright.  If you would like more, fold forward toward the floor, making sure the fold starts from the hip creases, rather than rounding the back. You can rest your head on a yoga block.  Hold for 5-10 deep breaths.


“Choose Your Own Adventure” postures  J

The next two postures can help counteract habits of turning in or turning out while running.  If you tend to “duck footed” or roll to the outsides of your feet, try Virasana to encourage more internal rotation of your thighbones.  If you tend to run “knock kneed” or roll in toward the arches of your feet, try Ankle to Knee to encourage external rotation of the thighbones.  Or do both postures, but spend more time in the one that counteracts your natural tendency.


Ankle to knee (Agnistambhasana)

This posture stretches deep muscles of the hips and encourages external rotation of the thighbones.

To get into the posture: sit on the floor, and bring your left shin parallel to the short edge of your mat, then stack the right shin on top of it, placing the right heel at the outside edge of your left knee.  If your hips resist this position, try sitting on a blanket or block.  If your left knee is off the floor, be sure to support it with a blanket or block.  If you are feeling a deep stretch staying upright, stay upright.  If you would like more of a stretch, fold forward toward the floor, making sure to fold from the hip creases rather than the low back.  There should be no pain or discomfort in the knees; if you feel pain in the knees, try just doing one leg at a time as pictured below.  Stay for 5-10 deep breaths, then repeat with the left leg on top.


Hero’s Pose (Virasana)

This posture encourages internal rotation of the thighbones, and it also stretches the quadriceps, knees and ankles.

To get into the posture: From hands and knees, bring your knees together and your feet just wide enough apart that you can sit between them.  If you are not able to sit all the way down on the floor, sit on a blanket or block.  Make sure the feet point straight behind you and the foot is in the same line as the shin, rather than feet pointing out to the sides.  There should be no pain in the knees or ankles; sit on more props (i.e. two blocks) to release pain in the knees, and place a rolled up towel under your ankles to relieve strain in the ankles.  Stay for 5-10 deep breaths.


Dancer Modification (Natarajasana)

Stretching the quadriceps before running can help keep the knees safe as you run.

To get into the posture: Stand with your feet hipbone width apart. Bend your right knee, bringing the heel toward your bum, and grab the foot with your right hand or both hands to pull it close to your bum, which keeping your low back long rather than arched.  Keep your right knee in line with your left, and imagine lengthening the right thighbone straight down toward the floor.  Hold for 5-10 deep breaths, then repeat with the left leg.


Crescent Lunge (Anjaneyasana)

Running can create tightness in the hip flexors, and this posture helps release the hip flexors and lengthen your stride.

To get into the posture: stand with your feet hipbone width apart. Step your left foot back to a lunge position; this can be a shallow or deep lunge depending on your hip flexibility. Make sure your right knee stays directly on top of your right ankle, and try to stack the left heel on top of the ball of the foot.  Draw your belly button in and up to support the low back, and lengthen your tailbone down toward the floor.  On an inhale, raise your arms to the sky, and take 5-10 deep breaths into the lengthening sensation in the front of your left hip, then repeat with the left leg forward.


Happy running!  J


Friday, July 10, 2015

Posture of the week - Ankle to Knee/Firelog Pose/Agnistambhasana

I am going to be completely "human" here and admit that despite years of practice, I still have pretty tight hips.  This is partially genetics, and partially because as a little kid I sat like the pic below all the time because crossed legged position was not comfortable to me.  In sitting that way, I exacerbated the tightness or my hips by never stretching or releasing them even when I had a child's malleable body.  And my hip tightness is also not helped by my sitting in front of a computer a lot, nor by my strong leg weight workouts.  :) So I have a lot working "against" my hips getting more open.

How I used to sit as a child. Seriously bad for the knees
and encouraged me to be really knock-kneed and tight hipped
in adulthood.


I have been in many yoga classes where the instructor called out Ankle to Knee pose and said something along the lines of "just stack your shins in front of you..." leaving me and my tight hips to find something else to do.  I think I was not alone in the feeling that ankle to knee is "impossible" for my hips, or that if I managed to wriggle my way into it, it left me feeling pain in my knees or rounded in my low back.  So after years of figuring it out in my own body, I have some ways to modify and work up to it that I would love to share with you!  We'll start from softest on the hips and progress on to harder variations.  NONE of these variations should cause pain or discomfort in your knee joints!  If you feel pain in your knees, back off from whatever variation you are doing.

Single leg modification, elevated:


1 leg at a time is much easier than both! Try this as a modification/replacement for ankle to knee, or use it as a warm up to help prepare your hips for the full posture.

To get into the posture: Sit on a block or a blanket, and extend your left leg straight forward from your hip.  Place a rolled up blanket under your left knee to keep the knee from hyperextending, since you are sitting on the block. Make sure left knee and foot face straight up, and flex your left foot.  Cross your right ankle just past your left knee, and flex the foot strongly to help protect the knee.  Stay upright if you are already feeling enough sensation, or fold forward without rounding the spine to make the release of the right hip a little more intense.  Stay for 5-10 breaths, then repeat on the other side.

For more intensity, fold forward, and possibly grab the foot.
Make sure not to round the spine to fold forward... )
...instead, fold from the hip creases and keep the spine long.


Single leg modification on the floor:


A slightly more intense modification - no props allows the hip to open a bit deeper.

To get into the posture: Set up as the above variation, but sitting on the floor instead of a prop.  If you feel your spine is rounded, go back to the previous variation.  As in the first variation, you can stay upright or fold forward.

Fold forward for more intensity in the posture possibly grabbing your foot.
As in the previous variation, be sure to not round the spine to fold forward...

...instead, keep the spine long.


Two block modification:


Ankle to knee, sitting on one block on the low level, second block under the bottom knee at medium level.

This is my favorite modification/variation, and I made it up myself!  (that's not to say somebody didn't already make it up and "copyright" it before me, but I was excited that I discovered it in my own body.  :)  )

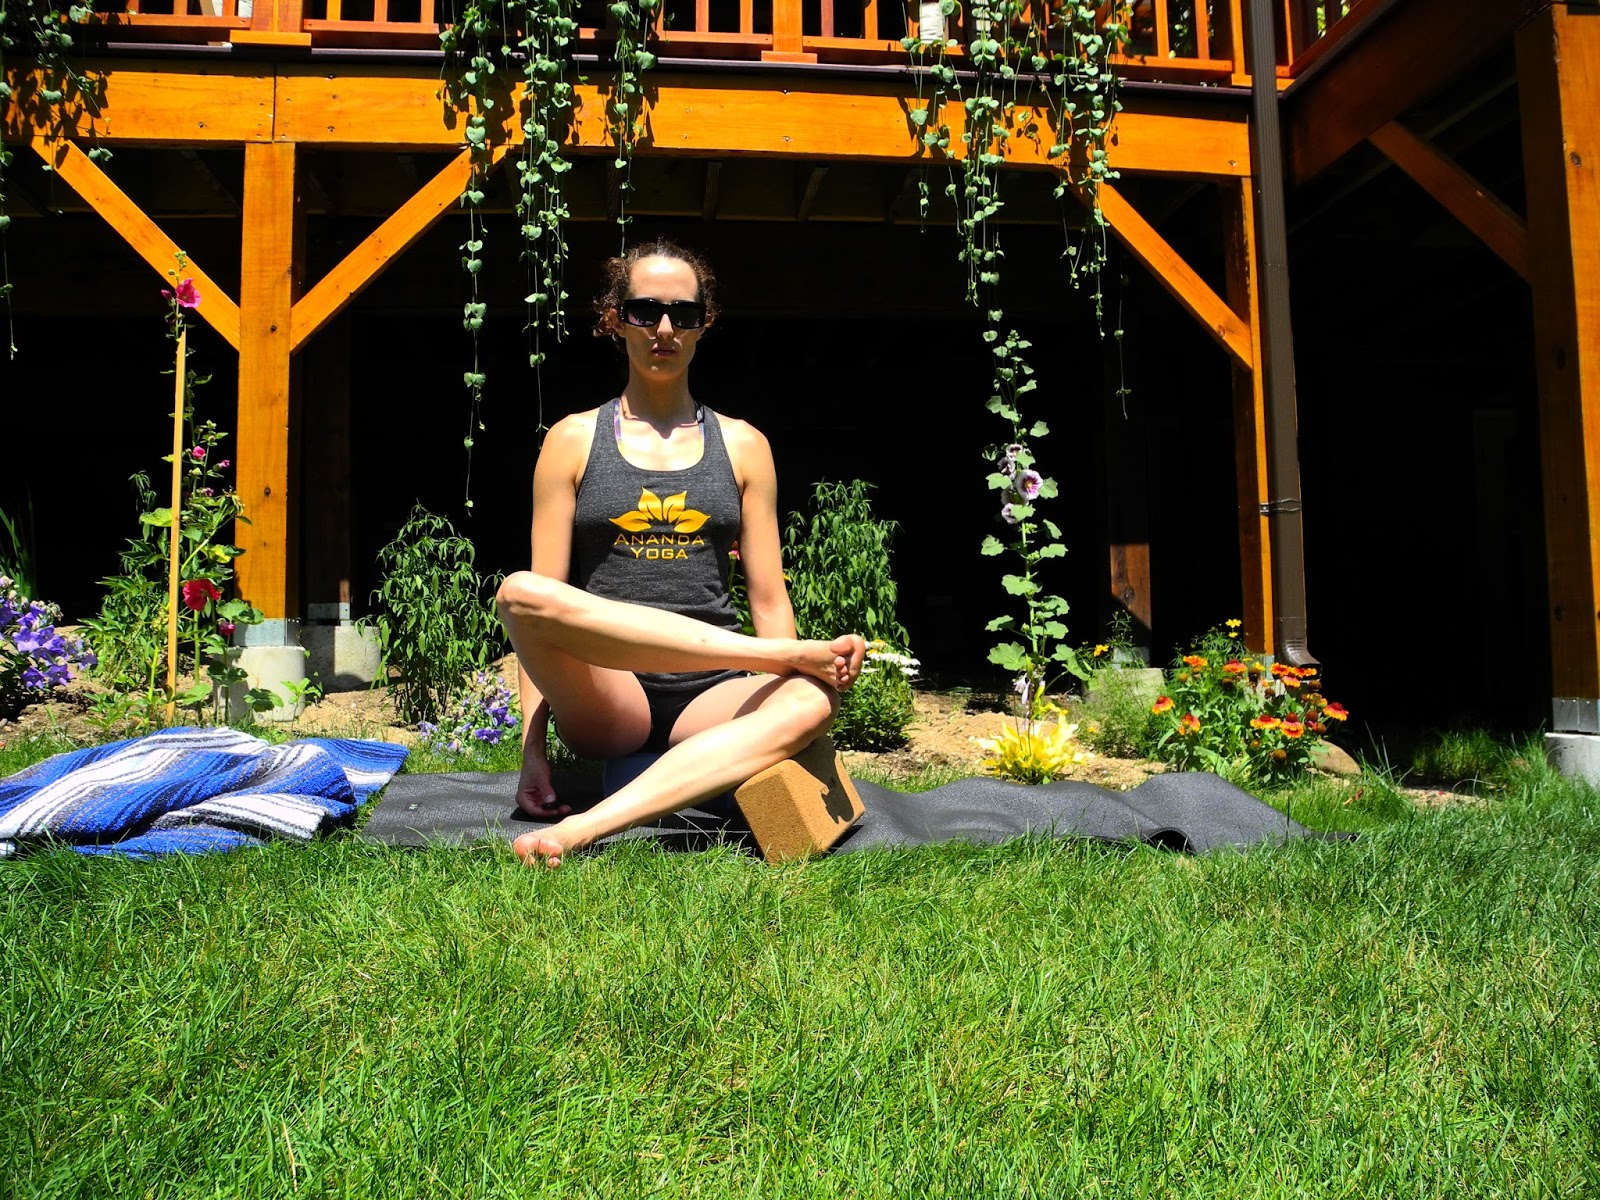
To get into the posture: sit on one of your blocks on its lowest level (or medium level if your hips have a lot of resistance). Bring your left shin parallel to the short side of your mat, and then stack your right shin on top, lining up the heels with the edges of your knees.  Make sure both shins are parallel to the short edge of your mat, and the bottom closer to your hips than your top.  Make sure your ankle isn't sickled; there should be no wrinkling in the skin on the inside of your right ankle, and the ankle should be in a neutral position.  If your left knee is floating off the floor (and it probably is if you are sitting on a block), then place your block diagonally across the knee joint to support it.  It is balanced on the edge so it is a flat surface to rest the knee on rather than an uncomfortable edge.  Make sure the block supports both the shin and the thigh, rather than just one or the other.  Lengthen the spine and sit up tall, or feel free to fold forward without rounding the spine.  Stay for 5-10 breaths, then repeat on the other side.  If you are not able to lengthen the spine and sit up tall, then lean back on your hands.

For more intensity, fold forward any amount, resting hands on the floor.
Make sure not to round the spine to fold forward.  Or if your spine is rounded when trying to sit upright, try the below:

Leaning back on the hands relieves some of the intensity from the hips, and allows the spine to be long instead of rounded.
The block under your knee can be at the high height to make it easier on your hips.
The block under your knee can be on the lowest level for more intensity.

Make sure the block supports both the shin and the thigh, unlike the pic above where only the shin is supported...

...or this pic above where only the thigh is supported.


Make sure your heel is all the way to the edge of the knee, unlike above where my heel is farther down my shin.
Also make sure the heel isn't past the knee as above.
Make sure both shins are parallel to the front of your mat, rather than the bottom shin tucked in like above.
Make sure the ankle isn't "sickled" as above.  The ankle should be in a neutral flexed position with the toes the same level as the ankle instead of above the ankle.

Ankle to knee, "cheater variation"


I call it cheater variation because it is one of the ways I "trick" my hips into getting into the full ankle to knee posture. The pressure of the elbow on the arch of the foot seems to get my top hip out of its own way, then when I come forward the hips do not resist as much.

To get into the posture: Sitting on the floor, stack your left shin on top of your right as before in the two block variation.  Rock onto your right sits bone, then twist and fold forward to your right bringing your left elbow into the inside arch of your left foot.  It is okay if your left sits bone lifts, but keep reaching it toward the floor or keep it on the floor if flexibility allows.  If your elbow won't reach the arch of your foot, then use forearm or grab the foot with your left hand.  If you have the flexibility to go deeper place both elbows on the floor as though you are doing forearm plank.  Press the left elbow back into the left knee, and feel how this creates more space in the left hip.  Stay for a few  breaths here.

If the elbow won't come all the way do the arch of your foot, you can put your forearm in the arch of your foot as above...

...or simply press your hand back into your foot as above.

If you have more flexibility, you can fold all the way down until your elbows rest on the floor.

Next, simultaneously bring your left sits bone back down onto the floor and swing the torso around to the front of your mat, so you end up in ankle to knee folding forward! If your right knee lifts off the floor at this point, support it with a blanket or block.  Or if folding forward is still too much, sit upright instead.

If your bottom knee floats off the ground in ankle to knee as above, make sure to support it with a block or blanket.

Ankle to knee with a blanket supporting the bottom knee.

Feel free to support the head or forearms with a block or blanket if you are folding forward.

Ankle to knee leaning forearms on a block.

Ankle to knee with the head supported with a block.

Take 5-10 breaths once you are folded forward, then repeat on the other side.


Ankle to knee: foot press variation (pic pressing on feet)

Ankle to knee, pressing the balls of the feet into the palms of the hands and vice versa, creating resistance to facilitate the release of the hips!


This variation "gets the hips out of their own way" and is a nice way to get deeper into the posture than you would by just stacking the shins.  The foot press can be done in ankle to knee on the floor, or also in the two block variation.

To get into the posture: Stack the shins for ankle to knee either with blocks or without.  Fold forward a bit, then place the palms of your hands onto the balls of your feet.  Press the balls of the feet into the hands as though you are trying to point your toes, but resist with the hands so the feel do not actually move.  Note the space being created in the hips, perhaps allowing you to fold a bit farther forward.  After holding for a few breaths, release the hands from the feet and settle into ankle to knee.  Hold for 5-10 breaths, then repeat on the other side.

Ankle to knee: foot press variation 2

In this variation, only the top foot is touched by the hand.  Hand is under the pinkie toe side of the foot, and press the pinkie toe side of the foot down toward the ground while resisting with the hand.  Do the same press with the bottom foot down into the ground.

This variation is another way to engage the lower legs to get more out of the hips.

To get into the posture: Stack the shins for ankle to knee with the right shin on top, then bring your left hand to the outside edge of your left foot.  Press the outside of the foot down into the hand while resisting with the hand so the foot doesn't actually move.  Do the same motion with the left foot, but pressing into the floor.  Hold for a few breaths, then release the press of the feet and settle in to ankle to knee for 5-10 breaths.

Meowttakes!!!

As always, my friendly kitties were around to "help" with the photos.  :)

What are you lookin' at?

Nala judges my form.  :)

Hey Merteuil, down in front!

Riddick says "stop sickling your ankle."

Not a flattering angle.  :)