
When you're on an airplane for a long time, doing a couple postures in the aisle might not be enough. If you are on an international flight, often times you can find slightly larger spaces to try some slightly "roomier" postures. The following postures that I love to do on an airplane take up a bit more space and can be awkward to do in the aisle, and they can possibly make the passengers near you uncomfortable with your feet/legs/bum too close for comfort. Keep these postures to slightly larger spaces on the airplane, like the galley, the bulkhead, or in rare cases there is enough space in the bathroom! (I love you and your big bathrooms, Japan Airlines... :) )
Only do postures in the galley if no flight attendants are there. Be respectful of the crew. :)
Notes on airplane yoga, reprinted from my previous article, skip this section if you already read it! :)
Airplane yoga is not your usual yoga practice, so please don't try to get to the depth you would in a normal class or home practice! When you do these postures, your body will more than likely be cold and stiff from sitting, so take it easy on yourself and release into each posture with care and mindfulness.
In close quarters, be careful of the aim of your derrière. Make sure you're not giving someone a free show that they are not interested in seeing. :) Aim it toward a wall or down the aisle.
Same with your feet - make sure they stay on the ground or touching your body if you are in the aisle, otherwise they may be uncomfortably close to someone's seat.
Make sure to be respectful of the crew and other passengers as they move around the plane. Do not get in their way with your postures, and make sure to apologize if you end up in their way accidentally.
Standing Cat/Cow (Marjaryasana and Bitilasana variation)
This mini flow wakes up the spine and opens the heart!
To get into the posture: Stand with your feet hip bone width apart. Bend your knees and take a little squat, placing your hands on your thighs. On an inhale, press your hands down into your thighs to arch/extend your spine into a little backbend, pressing your heart up toward the ceiling and looking up. On an exhale, round the spine and drop your chin toward your chest. Repeat 3-10 times on the tempo of your breath. Feel free to pause and breathe in one position or the other if it feels good to do so.
Crescent Moon (Indudalasana)
This posture nicely lengthens the sides of your torso and your low back.
To get into the posture: Stand with your feet hip bone width apart. On an inhale, reach your arms skyward and interlace the fingers in temple clasp, interlacing your last three fingers and crossing your thumbs with your pointer fingers together and pointing toward the ceiling. On an exhale, bend to the right, making sure to keep your right side body long as you bend; think more of lifting "up and over" rather than bending down. Make sure not to also fold forward, keep your torso sideways and rotating open. Hold for 3-5 breaths, then switch sides. You can also flow between one side and the other, as in inhale reach the arms up, exhale to the right, inhale back to center, exhale to the left, etc. If your shoulders are tender, try it with one arm at a time and the other resting at your side.
Note: At 5'9" I can't reach my arms straight up in an plane, as I hit the ceiling. :) I cheat by bending my knees a little as I reach my arms up (chair pose-ish), then straighten the knees as I bend sideways.
It depends on the size of the plane if I can actually do this posture - large planes: yes, tiny commuter planes: definitely no. :)
Chair twist (Parivrtta Utkatasana)
This twist helps release your low back after a long time seated. It also invigorates your legs!
To get into the posture: Stand with your feet together, then bend your knees into a squat, letting your torso come to about a 90 degree angle to your thighs. Bring your palms together at your heart, then on an exhale, twist to the right and fold slightly toward your thighs, bringing you left elbow to the outside of your right thigh, keeping the hands at your heart. Stay for 5-10 deep breaths, then repeat on the other side. You can choose to stand up and rest your legs between the two sides, or keep the legs in the squat position and do both sides.
If you are not able to bring your elbow to the outside of the opposite knee, try between the knees.
Make sure to keep your knees together and aligned with one another, don't let one knee poke forward.
Don't collapse/rest your torso onto your thighs, keep yourself upright with core strength. Keep thinking of lifting your heart away from your thighs. Try to have your shoulders slightly higher than your hips; you can get to that position by both bending your knees a little deeper and lifting your heart a little higher.
You can deepen the twist by reaching the arms straight out from the shoulders
Figure 4 pose (Eka Pada Utkatasana)
It feels SO GOOD to stretch out the hips during long flights in an uncomfortable airplane seat!
To get into the posture: Stand with your feet together, then bend your knees toward a squat. Bring all your weight into your right foot, then cross your left ankle above your right knee, balancing on your right leg. Try to keep your torso at a 90 degree angle to your right thigh. Flex your leg foot, making sure the left big toe is in line with the left knee, and there is no skin creasing on the inside of your ankle; in other words, keep your ankle in a neutral position. Hold for 5-10 breaths, then repeat standing on the left leg.
If this hurts your knees, partially unbend the standing leg and bring your torso more vertical. If it still hurts your knees, skip this posture.
This requires both a deep twist and a deep hip opening, so if you are feeling too stiff from the airplane seat, skip this posture!
Make sure the crossed over ankle isn't sickled, as this can irritate the knee.
To get into the posture: stand with your feet together, then bend the knees to a little squat. Transfer your weight into your right foot, then cross your left thigh over your right. If you are able, double-wrap the legs by bringing your left foot behind your right calf. Once the legs are set, cross your left arm under your right above the elbows, then take one of the three arm options: 1. Give yourself a hug with elbows crossed. 2. Bring the backs of your hands to touch. 3. Double-wrap the arms and bring your palms to touch. Lift your elbows toward shoulder height, and press your palms away from your face (if doing arm option 2 or 3). Stay for 5-10 breaths, then repeat with right leg on top and right arm on the bottom.
If your shoulders do not allow a double wrap of the arms as pictured above, try the two below.
If you are not able to double-wrap the legs, just do the first cross of the legs. You can also tap your toe on the floor for balance.
If balance is challenging or your legs get fatigued, lean back against a wall in the bulkhead.
Make sure not to round your upper spine. The upper back is broad (shoulder blades far away from each other), but not rounded.
Only do postures in the galley if no flight attendants are there. Be respectful of the crew. :)
Notes on airplane yoga, reprinted from my previous article, skip this section if you already read it! :)
Airplane yoga is not your usual yoga practice, so please don't try to get to the depth you would in a normal class or home practice! When you do these postures, your body will more than likely be cold and stiff from sitting, so take it easy on yourself and release into each posture with care and mindfulness.
In close quarters, be careful of the aim of your derrière. Make sure you're not giving someone a free show that they are not interested in seeing. :) Aim it toward a wall or down the aisle.
Same with your feet - make sure they stay on the ground or touching your body if you are in the aisle, otherwise they may be uncomfortably close to someone's seat.
Make sure to be respectful of the crew and other passengers as they move around the plane. Do not get in their way with your postures, and make sure to apologize if you end up in their way accidentally.
Photos are especially "human" today - post run and weight workout, no makeup, and squinting from the bright sun. :D
Postures for the Galley or BulkheadStanding Cat/Cow (Marjaryasana and Bitilasana variation)
This mini flow wakes up the spine and opens the heart!
To get into the posture: Stand with your feet hip bone width apart. Bend your knees and take a little squat, placing your hands on your thighs. On an inhale, press your hands down into your thighs to arch/extend your spine into a little backbend, pressing your heart up toward the ceiling and looking up. On an exhale, round the spine and drop your chin toward your chest. Repeat 3-10 times on the tempo of your breath. Feel free to pause and breathe in one position or the other if it feels good to do so.
 |
| Standing cow. |
 |
| Standing cat. |
Crescent Moon (Indudalasana)
This posture nicely lengthens the sides of your torso and your low back.
To get into the posture: Stand with your feet hip bone width apart. On an inhale, reach your arms skyward and interlace the fingers in temple clasp, interlacing your last three fingers and crossing your thumbs with your pointer fingers together and pointing toward the ceiling. On an exhale, bend to the right, making sure to keep your right side body long as you bend; think more of lifting "up and over" rather than bending down. Make sure not to also fold forward, keep your torso sideways and rotating open. Hold for 3-5 breaths, then switch sides. You can also flow between one side and the other, as in inhale reach the arms up, exhale to the right, inhale back to center, exhale to the left, etc. If your shoulders are tender, try it with one arm at a time and the other resting at your side.
 |
| Crescent moon, going for a lifted "up and over" sensation. |
 |
| Try not to lean over an collapse into the side of your body. |
 |
| Try not to start folding forward, but rather think of opening your heart toward the sky. |
 |
| Try it with just one arm for a little softer variation. |
Note: At 5'9" I can't reach my arms straight up in an plane, as I hit the ceiling. :) I cheat by bending my knees a little as I reach my arms up (chair pose-ish), then straighten the knees as I bend sideways.
 |
| Bending my knees as I reach my arms up can give me space to extend my arms fully, then once I bend over to the side I straighten my legs, as the side bend also gives me space to extend my arms. |
It depends on the size of the plane if I can actually do this posture - large planes: yes, tiny commuter planes: definitely no. :)
Chair twist (Parivrtta Utkatasana)
This twist helps release your low back after a long time seated. It also invigorates your legs!
To get into the posture: Stand with your feet together, then bend your knees into a squat, letting your torso come to about a 90 degree angle to your thighs. Bring your palms together at your heart, then on an exhale, twist to the right and fold slightly toward your thighs, bringing you left elbow to the outside of your right thigh, keeping the hands at your heart. Stay for 5-10 deep breaths, then repeat on the other side. You can choose to stand up and rest your legs between the two sides, or keep the legs in the squat position and do both sides.
 |
| Prayer twist. |
If you are not able to bring your elbow to the outside of the opposite knee, try between the knees.
 |
| For a modification, elbow between the thighs instead of outside the thigh. |
Make sure to keep your knees together and aligned with one another, don't let one knee poke forward.
 |
| Knees misaligned, which means hips and low back are also misaligned. |
Don't collapse/rest your torso onto your thighs, keep yourself upright with core strength. Keep thinking of lifting your heart away from your thighs. Try to have your shoulders slightly higher than your hips; you can get to that position by both bending your knees a little deeper and lifting your heart a little higher.
 |
| Here I am leaning on my thighs, and my shoulders are lower than my hips. |
You can deepen the twist by reaching the arms straight out from the shoulders
 |
| Deeper variation with arms straight out from the shoulders. |
Figure 4 pose (Eka Pada Utkatasana)
It feels SO GOOD to stretch out the hips during long flights in an uncomfortable airplane seat!
To get into the posture: Stand with your feet together, then bend your knees toward a squat. Bring all your weight into your right foot, then cross your left ankle above your right knee, balancing on your right leg. Try to keep your torso at a 90 degree angle to your right thigh. Flex your leg foot, making sure the left big toe is in line with the left knee, and there is no skin creasing on the inside of your ankle; in other words, keep your ankle in a neutral position. Hold for 5-10 breaths, then repeat standing on the left leg.
Balance is tricky in a plane, extra bonus points if you keep your balance during turbulence. :) Keep a hand on an available wall (NOT another passenger's seat!) to steady yourself if needed.
 |
| Figure 4 pose. |
If this hurts your knees, partially unbend the standing leg and bring your torso more vertical. If it still hurts your knees, skip this posture.
 |
| Modified to be a little more upright. |
If you would like to go deeper into the hip stretch, bend forward and bring your spine parallel to the floor without changing the legs. Do not lean on your legs, keep holding your torso slightly off your legs with your core strength.
 |
| Folding forward increases the stretch in the hips. |
If you would like to go still deeper, straighten your standing leg and bring your hands to the floor.
 |
| For even more stretch, straighten the standing leg and bring your hands to the floor. I have tight hips AND tight hamstrings, so this is as far as I can go. :) |
Figure 4 Prayer Twist
A combination of the previous two postures, this is one of my favorite hip openers!
To get into the posture: from figure 4 pose with your left leg crossed over the right, bring your left elbow into the arch of your left foot, twisting to the right. Press the elbow into the foot to get a bit more leverage on both the twist and the hip opener. Hold for 5-10 breaths, then switch legs.
 |
| Figure 4 with a twist! |
This requires both a deep twist and a deep hip opening, so if you are feeling too stiff from the airplane seat, skip this posture!
If you are not able to bring your elbow to the arch of your foot, try your hand or forearm
 |
| Forearm to foot for a softer twist. Bring the other hand to your hip crease. |
 |
| If the forearm also won't reach the foot, you can hold the foot in your hand. |
Make sure the crossed over ankle isn't sickled, as this can irritate the knee.
 |
| Sickled ankle - see how the foot bends up? You can check for sickling by seeing if you can see your skin creasing on the inside of your ankle, or if you can see the bottom of your foot. |
 |
| Unsickled ankle, or in neutral position helps keep the knee safe. No skin creasing on the inner ankle, and I can only see the side of my foot, not the bottom. |
Eagle Pose (Garudasana)
This posture opens the upper back, stretches the shoulders and increases overall circulation.
 |
| Eagle pose with double-wrapped arms and double-wrapped legs. |
If your shoulders do not allow a double wrap of the arms as pictured above, try the two below.
 |
| Arm variation with a single wrap. |
 |
| Arm variation crossing the arms above the elbows is the most gentle. |
 |
| View of crossed arms from the back. |
If you are not able to double-wrap the legs, just do the first cross of the legs. You can also tap your toe on the floor for balance.
 |
| Single-crossed legs with toes tapped on the ground to help with balance. |
 |
| Single crossed legs with crossed leg floating if you don't need the toe down for balance. |
If balance is challenging or your legs get fatigued, lean back against a wall in the bulkhead.
 |
| Eagle pose using a wall for support. |
Make sure not to round your upper spine. The upper back is broad (shoulder blades far away from each other), but not rounded.
 |
| Try not to round your spine like this. |
 |
| Try to keep the torso upright. Lift your elbows to shoulder height and press your palms away from the face to get broadness across the back without rounding the spine. |
Rag Doll Forward Bend (Uttanasana variation)
This posture lengthens a tight low back and also stretches the hamstrings.
 |
| Rag doll forward bend with bent knees is safe on the low back. |
To get into the posture: stand with your feet hip-bone width apart (about 2 fist widths). Bend your knees a bit and fold your torso forward, hanging your head toward the floor. Start with the knees bent enough that your torso rests on your thighs to target the low back. Hold for 5-10 breaths, completely releasing the head and neck.
Then, if you can straighten the legs without the mid or lower back coming up higher than the hips, straighten the legs to target the hamstrings. Hold for 5-10 more deep breaths.
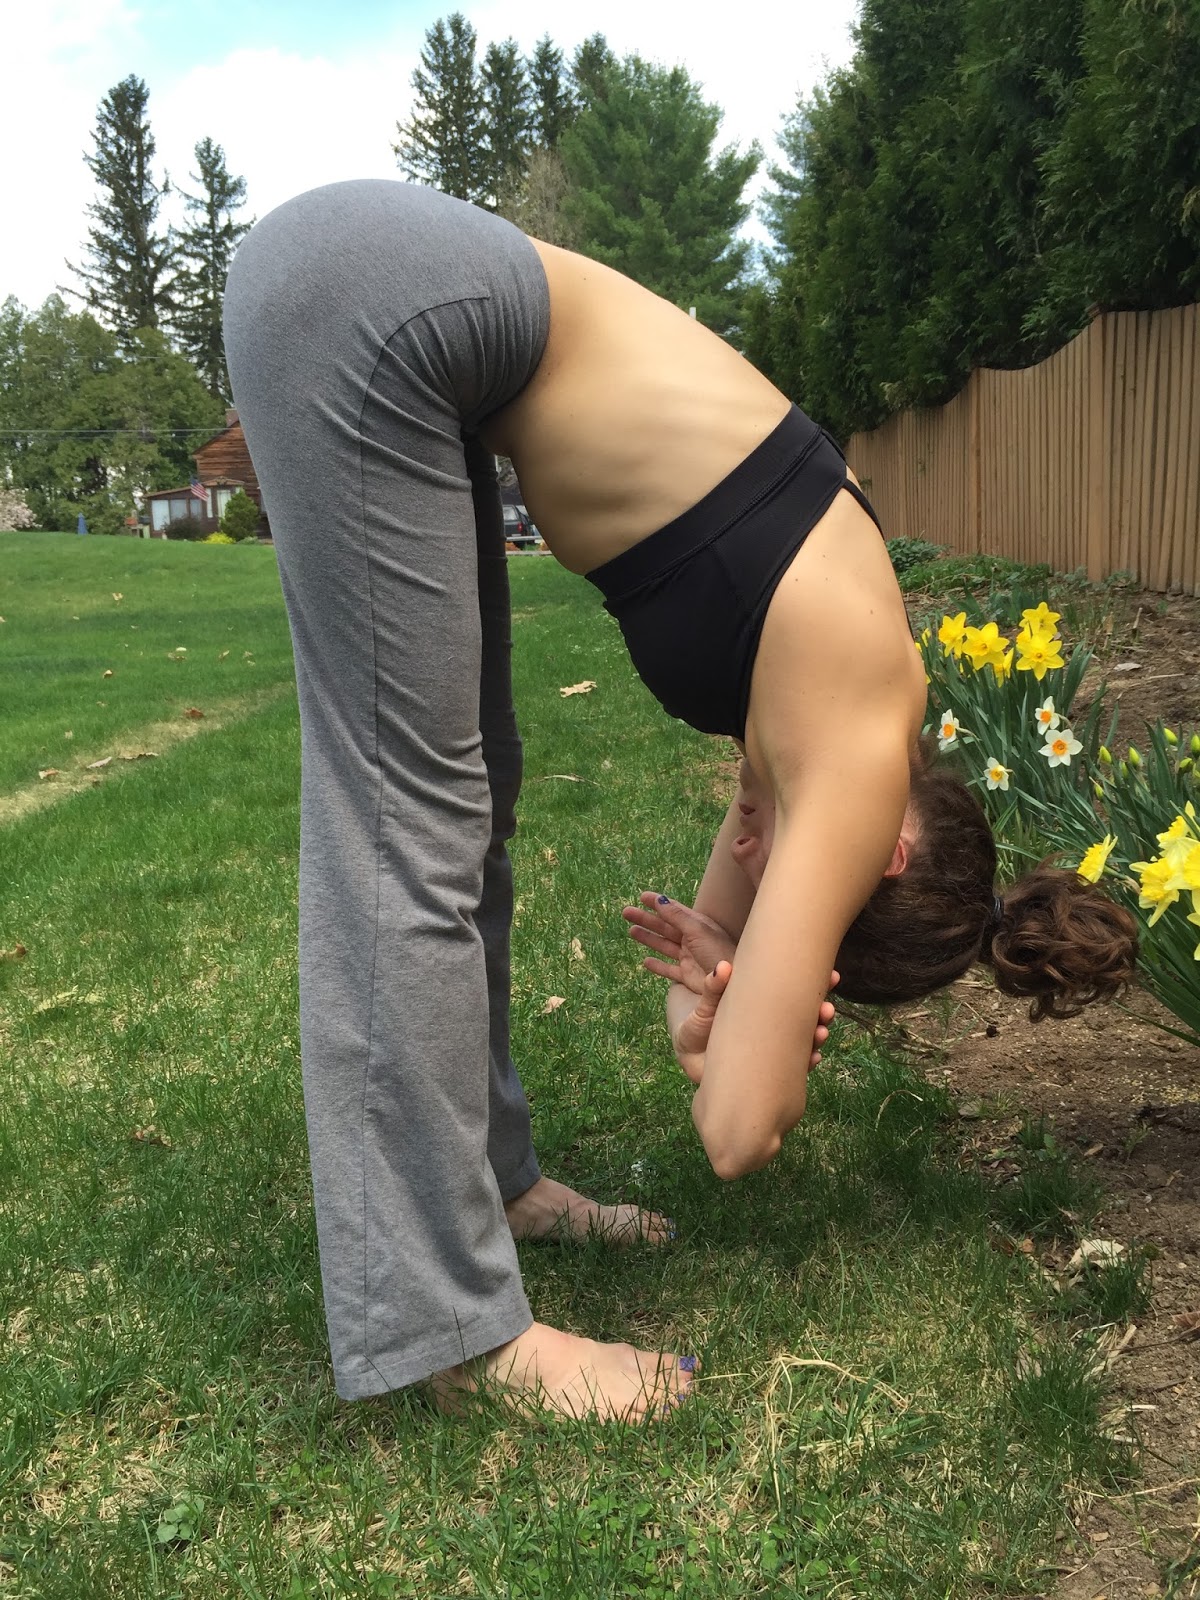 |
| Rag doll forward bend with legs straight. Despite my tight hamstrings, my low back is below my hips, so there is no pressure or discomfort in my low back. |
 |
| If your hamstrings and low back are tight, you may have your low back higher than your hips when you straighten your legs. This puts a lot of pressure on your low back and can cause pain, so be sure to bend your knees if this is the case! |