Thursday, February 12, 2015

Beginner's Guide to Yoga Props - Part 2: Straps, Blankets, Bolsters,Sandbags


If you read my previous post about yoga props, you already know what I think are the two most important props to consider for your practice: a yoga mat and a block.  The following props are also useful to make your practice more comfortable, and you'll find these in many studios, too!

Straps

I like to jokingly tell my students, "Straps make your arms longer."  :) Meaning a strap can bring something within reach of your hands, usually your feet.  Many postures have a grip of hand to foot as part of the posture, but many of us lack the flexibility required to get the hand to the foot, or to do it without straining the back.  When I first started practicing, I could barely reach past my knees when trying to bend forward and touch my toes!  This is not an exaggeration!  So using a strap allowed me to get a grip on my feet and use a pull on the strap to lengthen my spine and fold forward with a healthier alignment.

A strap allows you to get a grip on your foot in
big toe balance if you are not able to
grab your big toe.
Seated forward fold without a strap can cause you to round
the spine in a effort to reach the feet.
Using a strap for seated forward fold allows you to reach
your feet with your spine long and in a healthy alignment.

Rotated head to knee pose without a strap can cause you to
collapse forward in an effort to reach the foot.

Rotated head to knee pose with a strap allows you to roll
the heart open toward the ceiling while still grabbing the foot.

For this particular use of the strap, you could substitute several household items, like a belt, an old tie, an old extension cord, or a scarf that isn't too stretchy.

Big toe balance with an extension cord.  :)

The other use of the strap is to hold some part or parts of your body in a particular position.  For this use of the strap, you will need to use a yoga strap and not a substitute prop.  :)  Yoga straps come with an adjustable loop to hold parts of your body.  If you are considering buying a yoga strap, I'd suggest getting one with a pinch buckle clip rather than a D ring.  The clip allows you to get in and out of the loop more easily.  Also, the most versatile straps are the longer ones; 8 foot straps are plenty long for many different sizes of bodies and many different arrangements of the straps.  This is the one I use in my studio.

Supta baddha konasana with a strap holding the legs in place.
The strap lengthens the low back and gently presses down
on the thighs to open the groins a bit more.

Supported fish with a strap holding the arms and serving
as a hammock for the head.

A strap harness to open up the shoulders
and chest.
Blankets

Blankets provide support for the body in various positions.  The most common use for a blanket (or two or three...) is to elevate the hips in seated postures.  This allows the spine to be in its neutral curves and the knees to settle in line with the hips or slightly below.


Sitting on the floor can cause roundness in the spine and knees
 to be above the hips if your hips are not used to sitting this way.
Sitting on a blanket elevates the hips, allowing the knees to
settle in line with or below the hips, and the spine to be upright.
Blankets are also used as supports or padding for various parts of the body.  They provide a soft and comfortable way to keep your body in a certain position.  The blankets can be folded or rolled up in various ways to support many seated and reclining postures.

Shoulder stand with 3 blankets
supporting the upper spine so the neck
stays safe.

Supported fish with a blanket under the upper spine.

Blanket padding the knees in table pose.

You can also use them to keep warm, of course.  :)

Stay warm in savasana!  :) And you can use them to pillow your head!

If you do not have your own yoga blanket, you can substitute a beach towel or bed blanket, just make sure the blanket you choose is thick and supportive and doesn't "squish down" too much when you put weight on it, especially if you are using it for shoulder stand as in the picture above.  I use these Mexican blankets at my studio.


Bolsters

A bolster's basic purpose is also to support the body in a certain position, but it is larger and thicker than a blanket, so it can provide more support.  I call bolsters the Lazy Boy of the yoga props, as they make a very nice "recliner" for your body.  :)  This one is really nice.

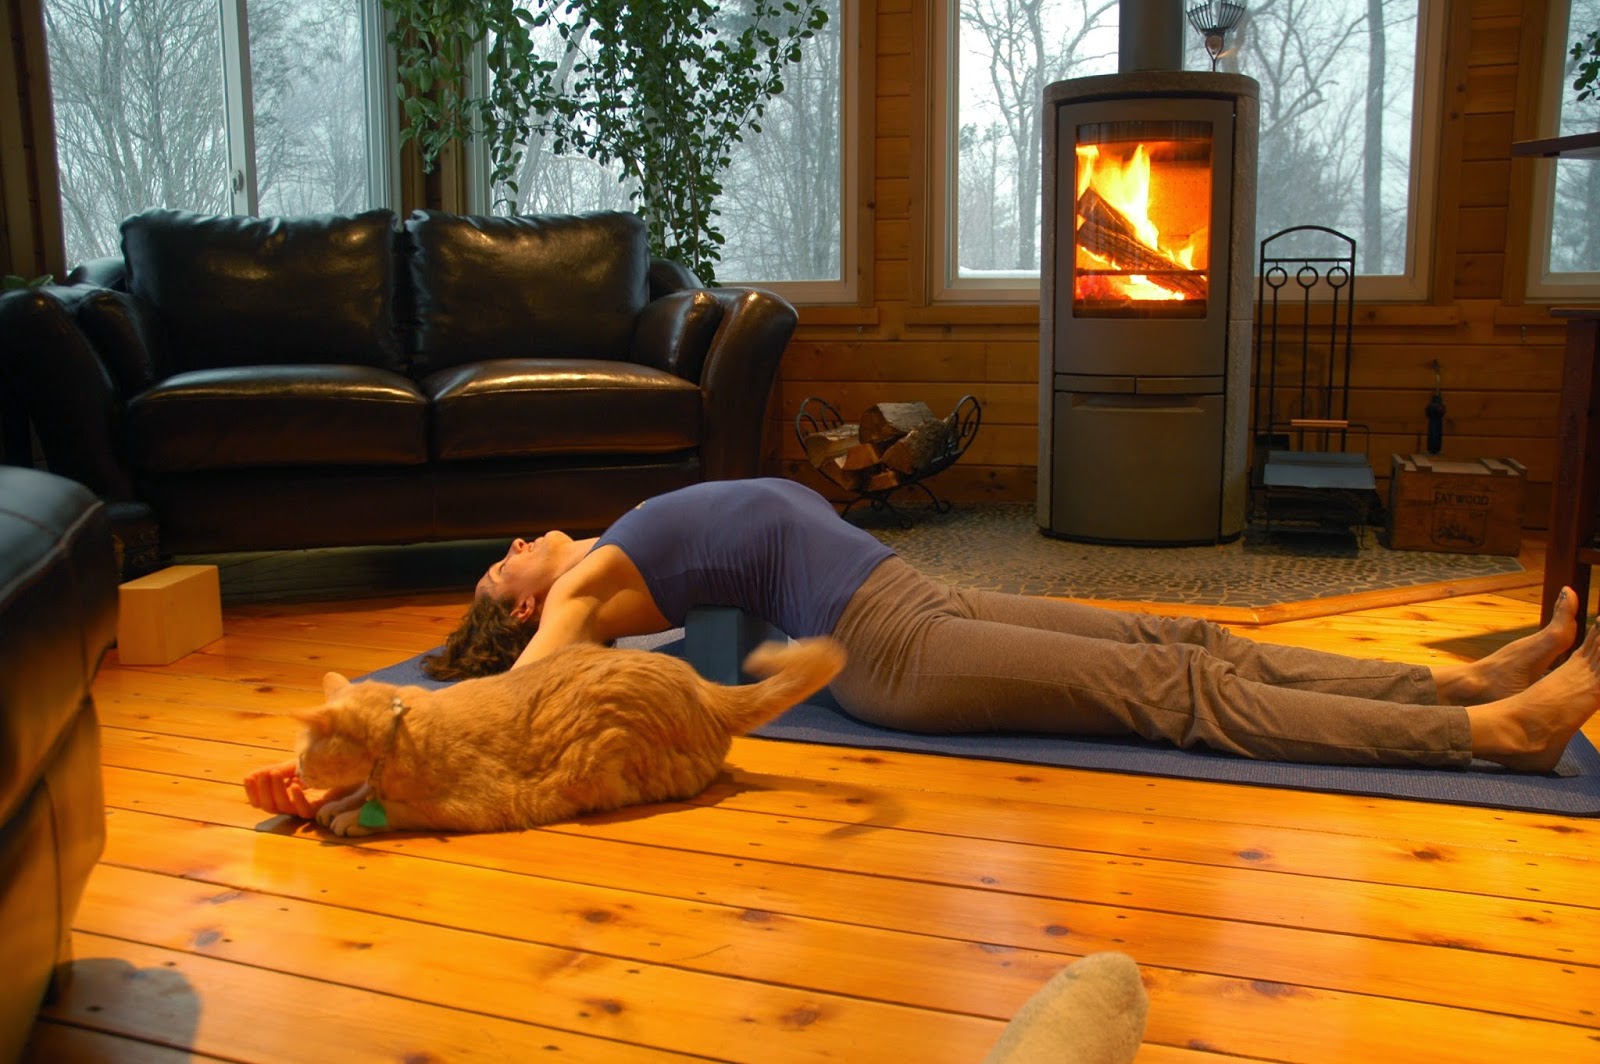
Savasana with a bolster under the thighs helps make it more
comfortable for your low back.

A restorative yoga spine twist, supported by the bolster.
Supta baddha konasana, supported by the bolster.

Sandbags

Sandbags are a nice little bonus prop, as they are not "required" for any posture, but their extra weight - around 10 pounds - can make certain postures feel more grounded, or can give you an extra bit of stretch.  You can get them online, then fill them with "play sand" from the hardware store.

A sandbag helps keep the knee grounded on the floor and increases the thigh and hip flexor release in half supra virasana.

A sandbag on the hips during savasana feels nice and grounding.

Add a sandbag to the top arm of
gommukasana to get an extra release
of the shoulder.

A sandbag on the feet in legs up the
wall helps to release the low back, and
feels really nice on the feet!

And the grand finale...  :D

Supta baddha konasana with all the "toys."  :) Two blocks
under a bolster, strap around the legs, sandbag on the feet,
and blankets under the knees!


Wednesday, February 11, 2015

Power Flow/Vinyasa Music Playlist from 11/28/13

This is another 1.5 hour playlist for a vinyasa/power flow yoga practice. One slow song for grounding, a few songs with a slower beat for sun salutations, up tempo funk-style songs for standing postures, and slower songs for seated and surrender postures.  The final chant is intended to be for savasana.

Things to know:

There are two songs missing that I couldn't find on Amazon.  The first is "Ode to Ganesha" by Bhagavad Das from the album Now.  It goes between the songs "Makyen Ghrir Allah" and "Dil Da Rog Muka Ja Mahi."  The second missing song is "Heaven" by Brandi Carlile.  It goes between the songs "Makambo" and " Le ciel dans un chambre."

The final chant by Craig Pruess and Ananda Devi is also really nice for a sound meditation.

If you like this playlist, check out all my playlists here!


Thursday, February 5, 2015

Supported Fish Arm Variations

If you are looking for ways to vary Supported Fish (Matsyasana) to make it more or less intense, or to target different areas of your spine and shoulder girdle, look no further!  These variations can be applied to Supported Fish on a block or blanket.

Arm variation 1 - Arms out from shoulders

The gentlest option for the arms is to extend the arms straight out from the shoulders with palms facing up, as detailed in my previous two articles. (Blanket variations and Block Variations)

Arms extended out from the shoulders is the most arm gentle variation.

Arm variation 2 - Arms up to 45 degrees

To bring more openness to the upper back and stretch the front of the chest and pectoral muscles, try this variation with the arms brought overhead 45-60 degrees as though you are about to make a snow angel.  The hands should still rest on the floor for this variation; if your arms are lifting, choose another variation, or lower the prop that is under your spine.

Bring the arms to 45-60 degrees to open the upper spine
and chest a bit more.

Arm variation 3 - Arms folded

To target the shoulders a bit more, you can fold your arms and bring your arms up overhead.  Make sure to grip above the elbows, grabbing your triceps, rather than grabbing your forearms.  The arms do not have to touch the floor, but be sure to completely release the shoulder muscles and let the arms fall toward the floor behind your head.

Arms folded variation.  Be sure to grasp your arms above
the elbows, grabbing your triceps, rather than below.

If you are not able to completely relax the arms while folded, you can support the folded arms with a block.

Arms folded, resting on a block for less intensity.

If you would like to intensify this variation more, you can fold the arms underneath the head.

For more intensity, fold the arms under your head.

Arm variation 4 - Temple clasp

To intensify the stretch of the chest and armpit area and further lengthen the spine, try temple clasp with the arms up overhead.  This variation is different than the others in that it is more active, as instead of letting the arms fall overhead, you will actively reach them in the direction of the pointer fingers, as though you are trying to touch the wall behind your head.

Temple clasp with 3 fingers interlaced and thumbs crossed.

IMPORTANT!

None of these arm variations should create tingling sensations in your shoulders, arms, or fingers.  You should not feel like your arms are "falling asleep" or feel any acute or "electric" pain sensations, as these could be a sign you are compressing nerves.  If you feel anything like this, you can try to release the tingle sensations by folding your arms above your shoulders until the tingling goes away, then bring your arms back into position.  If the tingling returns, be sure to change your arm variation to something more gentle.

Arms folded straight up to the ceiling as a brief break for
the intensity in the shoulders.


MEOWTTAKES!

Camera hogs Riddick and Nala.  :)

Nala says, "Look, this hand is perfectly positioned to
scratch my ears!


Monday, February 2, 2015

Beginner's guide to yoga props: Part 1 - yoga mats and blocks.

So, you've decided to try yoga! The start of a yoga practice is so exciting; I absolutely love teaching beginners!  I love to see people getting to know their bodies, learning how to honor both their strengths and limitations, and finding a steadiness physically and emotionally through their practice.

Of course those things take some time, and when you first start out, yoga may seem a little daunting. You may see shelves of all sorts of accoutrements for the practice and might wonder what they are all for.  Here's a little guide to a couple of the props that are used frequently in yoga classes, and also what ones you may want to have on hand if you are starting out a home yoga practice i.e. with YouTube videos.  :)  This post will cover the two most important - a yoga mat and block, and subsequent articles will cover other props such as blankets, straps and bolsters.

A Yoga Mat

The most important prop, a yoga mat is something you will want to have for yourself, even though most studios will lend you a mat.  Though at my studio I am quite fastidious about having students clean their mats with my naturally disinfecting mat spray when they are done using them, I have been to other studios or gyms where the mats get cleaned, shall we say, once in a blue moon?  Granted, I am a bit body-fluid-phobic, but some postures have my face resting on my mat - and my face is probably resting where somebody else's sweaty feet were in the previous class...  So, I have my own mat and take it with me wherever I practice.  :)

Yoga mats have a wide range of options and prices, starting from cheapies under $10 and higher end mats up to over $100!  If you are a beginner and trying out a yoga practice, you probably want to get a mat that is decent enough quality to support rather than hinder your practice, but not crazy expensive.  This is my favorite beginner yoga mat.  It is thick enough to be supportive, sticky enough that you don't slip (though it does need to be sprayed and wiped off a few times when you first buy it; it is a little slippery at first), long enough for most people's heights, AND it comes in many colors.  :)  This mat is around $20.

If you are shopping for a yoga mat yourself, make sure you get one that says "yoga mat" on the label and not "exercise mat."  Exercise mats tend to be thick, i.e. plenty of padding for doing crunches, but too thick for yoga.  The extra thick exercise mats can cause you to be unstable or even to turn your ankle in some standing postures.  They also tend to stretch, so standing postures will gradually get wider and wider... Imagine starting in a lunge and ending up in the splits as the mat stretches! (exaggeration, but you get the picture  :)  )

Also, if you are shopping for yourself, I would suggest getting a mat that is 3/16 inch or 1/4 inch thick, not the super thin ones you can find at department stores.  Slightly thicker mats are more comfortable for seated/reclining postures, but not so thick as to be unstable.

Super cheap mats that are around the $10 price range tend to be pretty slippery.  As someone new to yoga, you definitely don't want to have to worry about your hands or feet slipping around in standing postures or downward facing dog!

Sometimes a new yoga mat smells when you first purchase it; you've heard of "new car smell," how about "new mat smell?"  :)  Hang it up somewhere away from the sun and other heat sources, and let it air out for a few days if the smell bothers you.

Blocks

Yoga blocks are, in my opinion, the most essential prop for your practice after a mat.  Yoga blocks are  commonly used for a few basic purposes (these are not all inclusive, but just the basics!):

1.  To elevate the hips in seated postures. 

Elevating the hips when sitting on the floor can help with a number of issues.  Since we spend so much time sitting in chairs, our hips, legs and backs generally do not have the flexibility required to sit comfortably on the floor.  If you try sitting on the floor yourself, you may find your back rounds, your knees are high off the floor and you may find you have to hold yourself somehow with your arms.  When you elevate the hips a bit, it will allow your spine to lengthen and find its neutral curves, and also the hips to start to soften, allowing the knees to come closer to in line with the hips.

If Easy Pose (sukhasana) is not easy at all (spine
rounded, knees higher than hips)...

...then sitting on a block can help you to lengthen your spine
and settle your knees to the level of your hips or below.
Elevating the hips can also take pressure off the knees in certain postures, if deep flexion of the knees is not something your body is ready to practice.

If i.e. Hero's Pose (virasana) is too
strenuous on the knees...
...you can elevate the hips with a block
so the knees are comfortable.

2.  To make the floor an easier reach.

The full variation of various standing yoga postures with a hand or two on the floor, such as side angle pose or triangle pose, may not be accessible to many practitioners.  Placing a block under the hand allows you to find your full expression of the posture with safe alignment.

Side Angle (parsvakonasana) without a block - spine curved
sideways in an effort to reach the floor with the hand.

Side angle with a block allows the spine to be long and
straight rather than curved sideways.

Triangle (trikonasana) with torso falling forward toward the
 inside of the leg in an effort to reach the floor.

Triangle with a block allows the spine to be long, the ribs
to be stacked on on top of the other, and the spine to be
in line with the thigh rather than folding forward.

Using blocks under the hands in standing forward bends helps to protect the low back if you have a tight low back or hamstrings.

A safer forward bend for someone with low back issues.

3.  To support or prop up the body in a certain position.

Many times blocks are used to keep the body supported in a certain position, usually a position where your body is intended to relax and soften into the props.

Supported Bridge (setu bandhasana variation) with sacrum
supported by a block.
Supported Fish (matsyasana variation) with two blocks for
support.

There are many additional uses for blocks, but hopefully the uses above will convince you of the utility of a yoga block!  :) For yoga block recommendations, I recommend either a cork block like this one or a firm foam block like this one.  If you are shopping for one yourself, make sure you get one that is 4 inches thick, as the thicker ones are more stable and supportive.  If you opt for a foam block, make sure it isn't too "squishy." To test for squish, place the block on its tall end and sit on it.  The block shouldn't squish down with your weight, but should keep its shape and feel firm and stable.


A stable and high quality block keeps
its shape when you sit on it.

A low quality block squishes and feels
unstable when you sit on it.
For more about yoga props, check out Beginner's Guide to Yoga Props Part 2!