This series of postures is specifically for "cube dwellers," :) those of you who have a desk job and sit for most of your day. I used to have a desk job myself, and I have felt firsthand what a mess computer work can make of your body. I used to have frequent neck muscle spasms, chronically tight hips, poor posture, and RSI issues in my "mouse hand." In addition to those, many people who sit all day for their jobs have low back pain, shoulder issues or tightness, or general fatigue. Try this sequence when you get home from work, or try some of the postures during your workday to stretch out tight muscles and leave you feeling refreshed!
Many thanks to Riddick (my cat :) ) for the "help."
Cat Cow Breathing (Marjaryasana and Bitilasana)
This breath-with-movement sequence gives the spine a nice warmup before the subsequent postures in this series. It stretches alternately the front of the torso and the back of the torso.
To get into the postures: Come to hands and knees with your knees directly below your hips and your wrists directly below your shoulders. Outwardly rotate your upper arm bones so your elbow creases face forward, but make sure the elbows do not hyperextend. On an inhale, lift your face, chest and tailbone toward the sky for cow pose. On an exhale, round your spine, drawing your belly button up and in and tucking your chin and your tailbone for cat. Repeat the sequence 5-10 times, making sure that the transitions between the two postures last the same duration as your inhales and exhales.
 |
| Table Pose with a neutral spine. You can pad your knees with a blanket if your knees are sensitive. Notice that my upper arm bones are outwardly rotated and my elbow creases face forward. |
 |
| Make sure not to bow the elbows out like this... |
 |
| ...nor hyperextend them like this. Ouch! |
 |
| Cow pose, extending the spine on your inhales... |
 |
| ...and cat pose, flexing the spine on your exhales. |
 |
| If you don't have a blanket for your knees, you can also double fold your mat as shown here, or use a towel for padding. |
Table Pose with Wrist Release (Bharmanasana variation)
Typing and mousing can create tension and stress in the forearms and wrists. Try this posture to stretch and refresh sore and tired wrists.
To get into the posture: Come onto hands and knees with knees under hips and wrists under shoulders. Outwardly rotate the arms to turn the hands around so the fingertips point toward your knees. Plant the palms firmly into the floor. If you would like less of a stretch, walk the palms closer to your knees. If you would like more of a stretch, bring the hips slightly behind the knees to increase the extension of the wrists.
 |
| Table top wrist release. |
 |
| For less extension, walk knees closer to hands. |
 |
| For more extension, walk the knees farther away from the hands. |
Low Lunge (Anjaneasana variation)
Sitting all day keeps our hips in a flexed position, which tightens up the hip flexors. Tight hip flexors is one of many the desk-job-related tightnesses that can lead to low back pain. This posture lengthens and releases the hip flexors.
To get into the posture: Start from hands and knees, then bring your right foot forward to a lunge position. Depending on your hip flexibility, this can be a deep lunge or a shallow lunge, but make sure have enough distance front to back between the legs to feel a stretch in the front of the left hip. Make sure your right knee is directly on top of the ankle, rather than in front of the ankle. If your back knee is sensitive, pad the back knee with a blanket or double-folded mat. Start with your hands on the floor or two blocks. If you would like to take the posture deeper, bring your torso to vertical and rest your hands or forearms on your thigh. If you would still like more, on an inhale bring your reach your arms to the sky. Hold and breath for 5-10 breaths, then repeat with the left leg forward.
 |
| Start with hands on the floor, knee directly above the ankle. You can pad your back knee with blanket, double folded mat, or towel. |
 |
| Make sure your knee is not forward of the ankle joint... |
 |
| ...nor behind the ankle joint. |
 |
| If your hands do not easily reach the floor, or if you would like a more gentle lunge, try less distance between the front and back leg, and place your hands on blocks. |
 |
| If you would like more sensation in the lunge, you can bring your torso upright and cross your forearms on your thigh. |
 |
| Or for still more sensation, inhale your arms to the sky while keeping the hips just as low toward the floor as they were before you lifted your arms. |
Eagle Arms (Garudasana, arms only)
Eagle arms opens the shoulders and upper back. It can be done any time at your desk as a mini yoga break!
To get into the posture: Cross your right upper arm bone under the left, making sure the cross is above the elbows rather than below and wrap your hands around the back of your ribs, giving yourself a big hug. If you would like to go deeper, bring the backs of the hands to touch in front of your face. For the final option, wrap the wrists so the palms touch, creating a double wrap of the arms. Lift the elbows to shoulder height and press your palms away from your face. Stay for 5-10 breaths, then repeat with the left arm under the right.
 |
| Easiest option: arms crossed above the elbows. |
 |
| Next option, backs of the hands to touch. |
 |
| Double-wrapped eagle arms. |
 |
| If you double wrap the arms, make sure not to grip with the fingers as shown here, but rather let the palms touch with the fingers pointing up to the sky. |
Seated Forward Fold with strap (Paschimottanasana variation)
Sitting all day keeps our hamstrings in a flexed position, which can lead to chronically tight hamstrings. Tight hamstrings can be a root cause of low back pain. This pose stretches and lengthens the hamstrings and low back.
To get into the posture: Sit with your legs extended in front of you. Make sure to sit up tall and lengthen the spine. If your mid and low back are settling behind the hips, sit elevated on a blanket or two to help lengthen the spine. Loop your strap around the balls of your feet, then on an inhale pull on the strap to help lengthen the spine up toward the ceiling. On your exhale, fold forward using the support of the strap. You can walk your hands farther down the strap, but only walk them as far as your elbows stay bent and your shoulder stay soft. Hold and breathe for 5-10 breaths.
 |
| If sitting on the floor with your legs extended in front causes you to round your back and have your spine behind your pelvis like this pic... |
 |
| ...then you need to elevate the hips on a blanket or multiple blankets to allow your spine to be in its neutral curves. It should be fairly effortless to sit upright, so boost the hips up until it feels effortless. |
 |
| To get into the posture, with the strap looped around the balls of your feet, inhale and pull on the strap to lift your heart and extend the spine slightly... |
 |
| ...then exhale to fold forward and down, gently pulling on the strap to lengthen the low back. You can walk your hands forward on the strap, but keep the shoulder down away from the ears and the elbows bent. |
 |
| If you are able to reach your feet easily with your elbows bent and resting on the floor and your shoulders soft, feel free to grab the feet. (Riddick likes yoga time. :) ) |
 |
| If you have to round the spine, lift your shoulders or straighten your arms to reach the feet, use the strap instead for a safer alignment. Notice in this pic my spine is unequally rounded - mostly rounded in the mid to upper back with no lengthening forward of the low back. My pelvis is also tipping back, rather than forward with the spine. |
 |
| Ideally the spine should have equal length/roundness through the whole spine. My pelvis is tipping forward with the spine. |
Seated Neck Releases in Easy Pose (Sukhasana)
These stretches release the muscles in the sides and the back of the neck. You'll feel like your neck grew an inch after these!
To get into Easy Pose: Sit on the floor with one heel in front of the other. Your knees should be the height of your hip bones or slightly lower, and it should feel relatively effortless to sit upright. If your knees are above your hip bones, or if your spine is rounded and it is difficult to sit up straight, sit on a bolster, blanket or block.
 |
| If sitting on the floor leaves your spine rounded and your knees above your hip bones like this pic... |
 |
| ...then boost your hips with a blanket or a few blankets to allow your spine to be in its neutral curves and your knees to settle in line with the hips, or better yet, below the hips. |
Neck release 1: While sitting tall with an upright spine, drop your left ear toward your left shoulder. Make sure to entirely release the neck to gravity and not hold it up at all. To deepen the release, reach your right hand actively down and out toward the floor. To further deepen the release, bring your left hand on top of your head and add the weight of the left arm to your head without actively pulling on the neck; let gravity do the work. Hold for 5-10 deep breaths, then move on to the next release.
 |
Neck release 1, reaching the arm
out and down. |
 |
Adding the weight of the arm to
further open the side of the neck. |
Neck release 2: From the previous position, turn your head and look down toward your left shoulder. If you are using the left arm on the top of the head, release the arm before moving the head, then move the arm to the back of the head, holding on to the base of your skull, and continue to let gravity pull the head down. Hold for 5-10 deep breaths, then move on to Neck Release 3.
 |
| Neck release 2, looking down toward the shoulder. |
Neck release 3: Bring your head back to the position of Neck Release 1. Rotate the left ear toward your sternum, so you end up looking to your right with your head dropped forward toward your chest. If you have your hand on your head, release the arm to move the head, then continue to hold on to the base of your skull and let the weight of the arm deepen the release. Hold for 5-10 deep breaths.
 |
| Neck release 3, rotating the ear toward the sternum. |
Once your have done all three release, switch to the other side. Also switch the cross of your legs so the other leg is in front to balance out your hips.
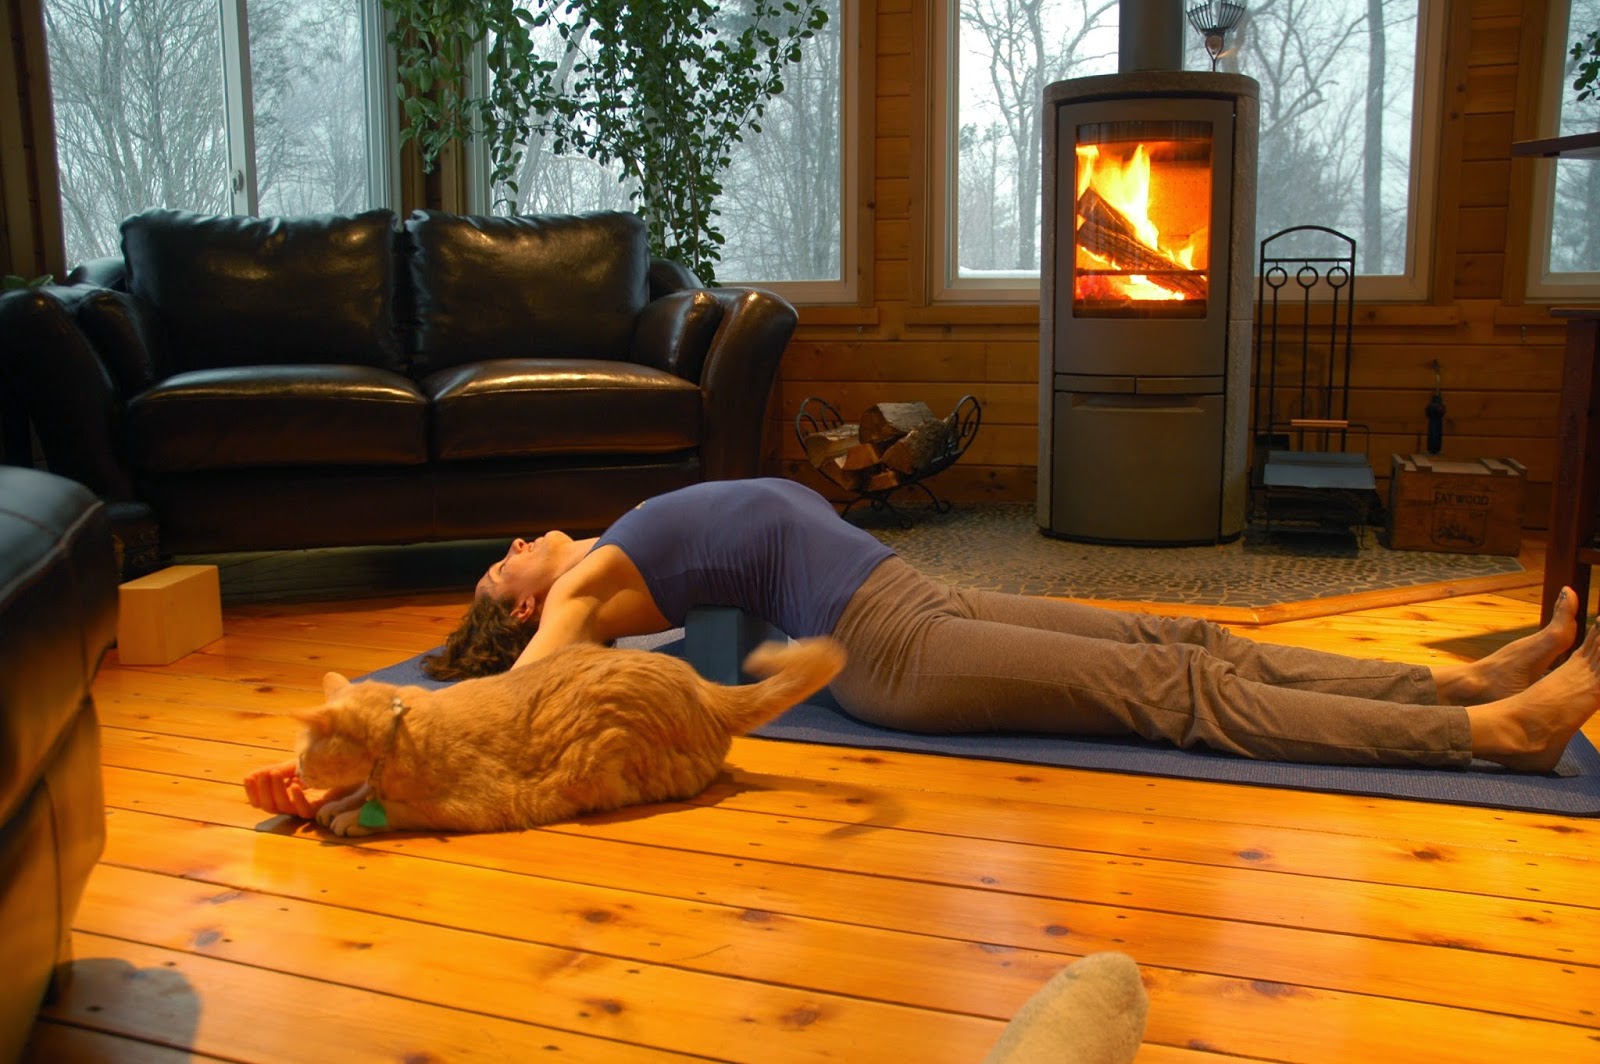
Supported Fish (Matsyasana variation)
 |
| Supported fish, rolled up blanket variation. |
If you read
this post of mine, you know that supported fish is a posture I think is important for everybody to do, but especially computer users! If you have been sitting slumped in front of a computer, or if you have been leaning back into a chair, this posture helps to realign the spine and bring it from a slouchy, rounded position to a more efficient and neutral alignment. It releases the muscles of the back, chest, neck and shoulders and can help relieve shoulder and neck pain, tension headaches and low back pain.
To get into the posture: Choose a prop to place under your upper spine. The prop could be a folded blanket or towel, a rolled up blanket or towel, a block on any height, or a foam roller. Lie down over the prop so that the bottom tips of the shoulder blades barely spill over the edge of the prop. Lengthen the back of the neck and allow your head to rest on the floor. If the head does not comfortably and easily reach the floor, place another prop under your head for support. Reach the arms straight out from the shoulders, palms facing up. Extend your legs straight forward from the hips. Rest and breath deeply for 5-10 breaths, or up to 5 minutes. For more details and variations, check
here and
here.
Sphynx Pose
This posture looks deceptively easy, but your upper back and triceps can definitely build some heat in this posture. It is a great way to safely get the upper spine into a gentle backbend.
To get into the posture: Lie on your belly, then prop yourself up on your elbows, starting with your elbows directly below the shoulders. Make sure not to collapse your torso into your shoulder joints, put rather press your elbows down into the floor to lift your torso out of your shoulders. From this position, walk your elbows forward from the shoulder joints until your lowest ribs touch the floor. Engage your core to roll your tailbone down toward the floor, which lengthens out your low back. From here, grip the floor with your palms and engage the triceps as though you are going to pull yourself across the floor through your arms. You will feel a strong engagement of the upper back and triceps. Hold for 5-10 deep breaths, then release and rest with one cheek to the mat, arms at your sides with palms facing up, big toes together and heels apart, letting the back release.
 |
| Start out with your elbows under your shoulders, pressing the elbows into the floor to lift your torso out of your shoulders. |
 |
| Make sure not to collapse your torso into your shoulders as shown here. |
 |
| Next, walk your elbows forward from the shoulders until the lowest ribs touch the floor, then engage the pull forward as though you are going to pull yourself across the floor. |
Locust Pose (Salabasana)
If you sit leaning back in a chair all day, your low back and core muscles can weaken and not efficiently support your spine. This pose opens the chest and shoulders and strengthens the low back. Lying on your belly also gives a gentle stimulation to the digestive organs.
To get into the posture: Lie on your belly, and interlace your fingers behind your back with palms facing each eachother. If your shoulders resist and your fingers won't interlace easily, hold a strap between your hands. Bring your forehead to the mat, squeeze the thighs together, and on an inhale lift your face, chest, arms and legs off the mat. If it is accessible for your shoulders, lift your hands up off your bum. Make sure the elbows do not hyperextend. Hold and breathe for 5-10 slow, deep breaths.
 |
| Locust pose with fingers interlaced. |
 |
| Locust pose with a strap held between the hands, an easier option for tighter shoulders. |
Meowttakes!
Trying to get photos taken with a very affectionate kitty around is always a challenge... :)