
For those of you who are new to yoga, or even those of you who aren't, downward facing dog can be a challenging posture to work into your body. My own downward facing dog I still continue to refine, and I have been practicing for more than 10 years!
The basic position of downward facing dog is an inverted V with the hands and feet on the floor. It sounds simple, but downward facing dog requires strength in the shoulders, arms, and core, as well as flexibility in the back, legs and shoulders. This sequence will help you into downward facing dog by building the strength and flexibility required to work the posture into your body.
I'd love to thank my very first Featured Yoga Human, Marcy, for posing for the photos! :)
Legs Up the Wall (Viparita Karani)
Legs up the wall helps your body to learn the correct angle between the spine and thighs for downward facing dog. Eventually when you come to downward facing dog, there should be approximately a 90º angle between the spine and the thighs, and legs up the wall automatically has that angle; it is basically downward facing dog flipped over. This posture is also a really nice release for the low back and a nice way to refresh tired, achy legs.
To get into the posture: Sit sideways against a wall with one shoulder against the wall. Drop back onto your elbows and lift the legs, then spin your body so your bum faces the wall and your legs extend up the wall. Lie down on your back and reach your arms up overhead, palms facing up. Stay for anywhere from 10 breaths to 5 minutes.
Helpful hints:
-If you are unable to straighten your legs up the wall with your bum close to the wall, scoot away from the wall a bit.
-If you are unable to rest your arms on the floor overhead, strap the arms to slightly wider than shoulder width apart and support them with a blanket. If your shoulders are still uncomfortable, then rest your arms at your sides with palms facing up.
Wall Dog
Wall dog is basically downward facing dog tipped up 90º. It helps to release the arms, shoulders and backs of the legs, as well letting your practice creating length in your spine by pressing into your hands.
To get into the posture: Stand facing the wall, about 3 feet away from the wall. Bring your palms to the wall at hip height and shoulder width apart (middles of your wrists in line with outside edges of your shoulders), fingertips pointing up to the ceiling. Bend forward and bring your spine parallel to the floor and in line with both your hips and your hands, walking the feet farther away from the wall as needed to create space. Hold for 5-10 breaths.
Helpful hints:
-Make sure you don't "hang" in your shoulders. Hold your body in place with your core, arms and legs rather than letting your chest collapse toward the floor. Keep pressing your hands forward into the wall and lengthening your spine away from the wall.
-Make sure also that your spine in not rounded. A mirror is helpful in checking this for yourself, as when you are new to your practice it is difficult to figure out what your spine is doing without looking. If your spine is rounded, walk the hands up the wall and come to more a diagonal to the floor until the spine is able to be straight, or try walking your feet a little farther from the wall.
-If your hamstrings feel strained with your legs straight, then bend the knees a bit and walk the hands down the wall so they are still the same level as the hips.
Plank Pose
Plank pose helps to build your shoulder strength and prepares your arms, shoulders and core to hold your body weight. It is helpful to use a mirror to check your body position in this posture. Also, the distance between your hands and feet in a plank pose will be the same for downward facing dog.
To get into the posture: Come to hands and knees with your knees hip bone width apart and hands shoulder width apart. Make sure your wrists are directly below your shoulders, and press the floor away from you with your hands. Engage your core and keep your hips up in line with you shoulders, then walk the ball of one foot back until your leg is straight, then follow with the other. Hold for 5 breaths up to one minute.
Helpful hints:
-If you are not able to hold for at least 5 breaths, or if you are collapsing in your low back, try it with the knees down. From hands and knees, walk your knees back a few inches while still keeping the hips up in line with the shoulders. Make sure to keep your core engaged and do not collapse in your low back.
-Make sure you do not collapse in your shoulders. Keep pressing the floor away from you with your hands, lifting your torso out of the shoulders.
-Make sure you have the correct distance between your hands and feet. Your hands should be directly under your shoulders rather than in front of the shoulders (feet are too far from hands), and your hips should be in line with your shoulders rather than up in the air (feet too close to hands).
Extended Child's Pose (Balasana)
Extended child's pose is a nice rest after plank, and it also gently releases the back and shoulders.
To get into the posture: From hands and knees, bring your knees wide to the edges of your mat and bring your big toes together. Sit down on your keeps, and fold forward and bring your forehead to the mat. Hold for 5-10 breaths.
Helpful hints:
-If your head doesn't reach the floor easily, place a blanket or block under your head for support.
-If you are not able to fold forward enough to put your head on a block, or if you feel like there is a lot of your body weight resting on your head when you try to reach the floor, then support your entire torso with a bolster.
-If you feel pressure on your knees, try it with a blanket between your thighs and calves.
Downward Facing Puppy
Downward facing puppy is a nice "pre" downward facing dog. It brings your back and shoulders into the flexibility and alignment required for downward facing dog, but without as much strength as downward facing dog requires.
To get into the posture: Come to hands and knees with your knees hip bone width apart (two fist widths). Drop down onto your elbows, and bring your hairline to the floor (where your hair and your forehead meet). Extend your arms forward from the shoulders until the arms are straight, palms pressing into the floor shoulder width apart and elbows off the floor. You should now be in a straight line from your fingertips to your tailbone. This is the same straight line of energy you will want to duplicate in downward facing dog. Hold for 5-10 breaths.
Helpful hints:
-Make sure to keep your hips directly on top of your knees rather than bringing the hips forward.
-Make sure not to collapse in your low back. Draw your belly button toward your spine and lengthen your low back.
-Make sure to not relax the arms and let the elbows rest on the floor, but rather press the hands down and forward into the floor and lengthen your tailbone away from the fingertips.
Downward Facing Dog, Knees Bent (Adho Mukha Svanasana)
This is the next "pre" downward facing dog, and for many people, beginners and experienced alike, this is the FINAL downward facing dog, as a lack of flexibility or strength may prevent straightening the legs while maintaining safe alignment.
To get into the posture: From hands and knees with knees hip bone width apart and hands shoulder width apart, walk your hands a few inches forward of the shoulders. Press into the hands and send your hips back toward your heels, bring your upper body and arms into a straight line from fingertips to tail, then lift the hips off the heels around 12 inches or slightly more. Keep the knees deeply bent, even perhaps having your ribs touch your thighs. Stay and breathe for 5-10 breaths.
Refining the posture:
-To find the correct distance between your hands and your feet, from downward facing dog, come forward to plank pose, bringing the shoulders directly on top of the wrists and the legs straight. If needed, move your hands and feet to the correct spacing and alignment for plank as described above. Then press back to downward facing dog without moving the hands or feet.
-Make sure you are in a straight line from fingertips to tailbone - a mirror is helpful to check this. Especially make sure your shoulders and chest are in the straight line, rather than above it.
-Outwardly rotate your upper arm bones. One way to do this is to bend your elbows out like chicken arms, then with the elbows still bent, turn the elbow creases to face the ceiling. From that point, straighten the arms. The elbow creases will not face as far forward as they did with elbows bent, but the upper arm bones will now be a bit outwardly rotated rather than the elbows pointing off to the sides.
-Make sure to balance the weight in all parts of your hands, spreading the fingers wide and gripping the mat rather than putting all the weight in the wrists.
From the previous postures there were a number of indicators that you may want to stick with this bent knee version of downward facing dog for now rather than straightening the legs:
1. If legs up the wall required you to either scoot your bum farther away from the wall than about 12 inches, or if you were unable to bring your arms to the floor overhead.
2. If wall dog required you to walk your hands up the wall, feet away from the wall, or bend your knees to avoid rounding the spine.
3. If you were unable to bring your shoulders and chest down into the line of energy from fingertips to tailbone in downward facing puppy.
Downward Facing Dog
If you are able to keep the alignment of the upper body that you found in downward facing dog with knees bent, you can try straightening the legs.
To get into the posture: from the knees bent variation, maintain the upper body alignment that you had with knees bent, and straighten the knees. Draw the belly button up and in to lengthen and protect the low back. Flex the quadriceps to lengthen the backs of the legs, and press the heels down toward the floor; it does not matter if they actually reach the floor. Hold for 5-10 breaths, then release and rest in extended child's pose.
Helpful hints:
-As in wall dog, make sure to not collapse into your shoulders, rather keep the chest and shoulders in one long line of energy.
-If you want to warm up the hamstrings a bit before trying to straighten the legs, you can bend one knee then the other, alternating. I call this "walking the dog." :)
___________________________________________________
About today's Featured Yoga Human, Marcy
Practicing yoga since: Spring 2013 - started private yoga sessions with me!
Style of practice: Hatha/vinyasa private sessions 2-3 times per week
___________________________________________________
MEOWTTAKES!
Taking "selfies" of the postures with a 10 second timer made for some interesting kitty photo bombs. I had to crop various kitties out of almost every photo I took... :D
 |
| Downward facing dog in my garden. :) |
The basic position of downward facing dog is an inverted V with the hands and feet on the floor. It sounds simple, but downward facing dog requires strength in the shoulders, arms, and core, as well as flexibility in the back, legs and shoulders. This sequence will help you into downward facing dog by building the strength and flexibility required to work the posture into your body.
I'd love to thank my very first Featured Yoga Human, Marcy, for posing for the photos! :)
Legs Up the Wall (Viparita Karani)
Legs up the wall helps your body to learn the correct angle between the spine and thighs for downward facing dog. Eventually when you come to downward facing dog, there should be approximately a 90º angle between the spine and the thighs, and legs up the wall automatically has that angle; it is basically downward facing dog flipped over. This posture is also a really nice release for the low back and a nice way to refresh tired, achy legs.
To get into the posture: Sit sideways against a wall with one shoulder against the wall. Drop back onto your elbows and lift the legs, then spin your body so your bum faces the wall and your legs extend up the wall. Lie down on your back and reach your arms up overhead, palms facing up. Stay for anywhere from 10 breaths to 5 minutes.
 |
| Legs up the wall with arms overhead is an inverted downward facing dog! |
Helpful hints:
-If you are unable to straighten your legs up the wall with your bum close to the wall, scoot away from the wall a bit.
 |
| Scoot your bum away from the wall a bit if your hamstrings are tight. |
-If you are unable to rest your arms on the floor overhead, strap the arms to slightly wider than shoulder width apart and support them with a blanket. If your shoulders are still uncomfortable, then rest your arms at your sides with palms facing up.
 |
| Legs up the wall with arms supported. You can also use a rolled up blanket or bolster if you need more support. |
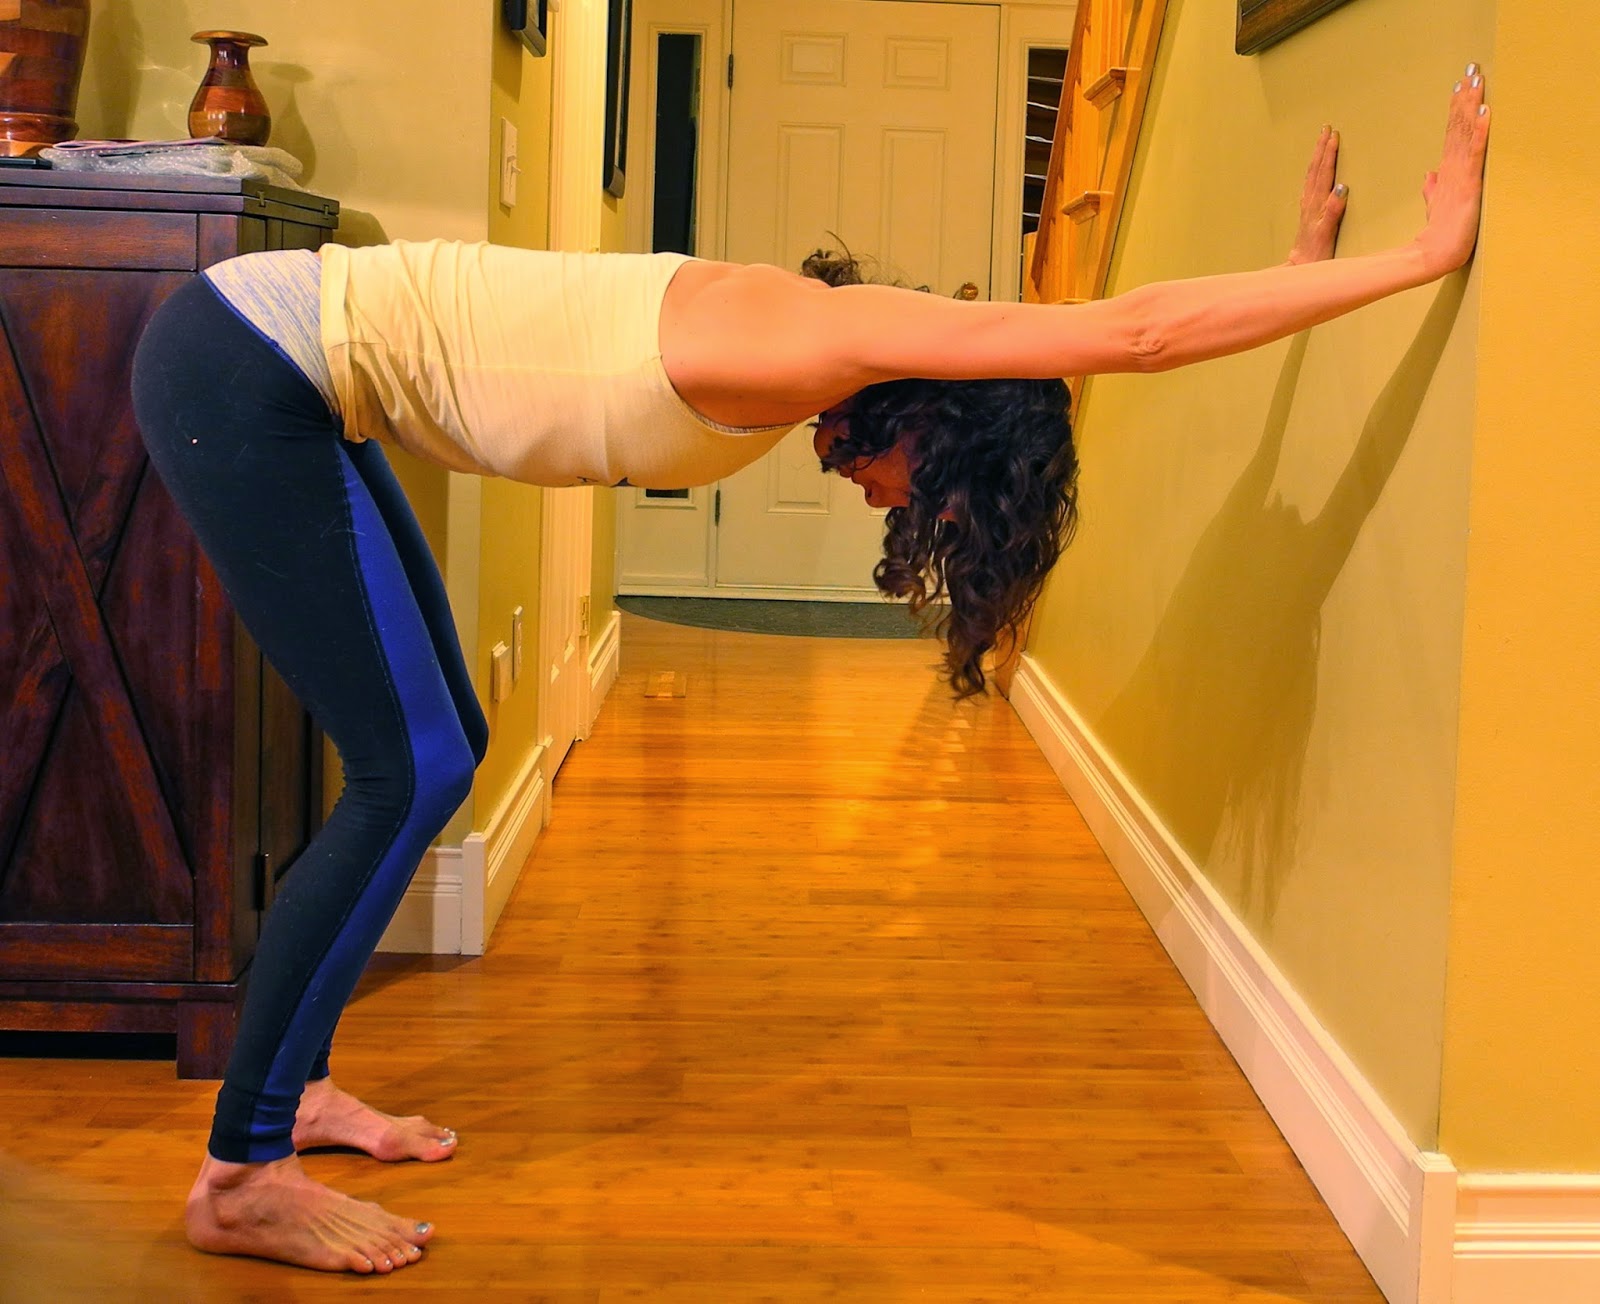
Wall Dog
Wall dog is basically downward facing dog tipped up 90º. It helps to release the arms, shoulders and backs of the legs, as well letting your practice creating length in your spine by pressing into your hands.
To get into the posture: Stand facing the wall, about 3 feet away from the wall. Bring your palms to the wall at hip height and shoulder width apart (middles of your wrists in line with outside edges of your shoulders), fingertips pointing up to the ceiling. Bend forward and bring your spine parallel to the floor and in line with both your hips and your hands, walking the feet farther away from the wall as needed to create space. Hold for 5-10 breaths.
 |
| Wall Dog is a nice prep for the shoulders, legs and back. |
Helpful hints:
-Make sure you don't "hang" in your shoulders. Hold your body in place with your core, arms and legs rather than letting your chest collapse toward the floor. Keep pressing your hands forward into the wall and lengthening your spine away from the wall.
 |
| Don't collapse in your shoulders! |
-Make sure also that your spine in not rounded. A mirror is helpful in checking this for yourself, as when you are new to your practice it is difficult to figure out what your spine is doing without looking. If your spine is rounded, walk the hands up the wall and come to more a diagonal to the floor until the spine is able to be straight, or try walking your feet a little farther from the wall.
 |
| If your spine is rounded like above... |
 |
| ...try walking your legs a bit farther back so your body is in a wider-than-90º angle... |
 |
| ...or walk your hands farther up the wall so your body is at a wider-than-90º angle. |
-If your hamstrings feel strained with your legs straight, then bend the knees a bit and walk the hands down the wall so they are still the same level as the hips.
 |
| Wall dog with bent knees helps tight hamstrings. |
Plank Pose
Plank pose helps to build your shoulder strength and prepares your arms, shoulders and core to hold your body weight. It is helpful to use a mirror to check your body position in this posture. Also, the distance between your hands and feet in a plank pose will be the same for downward facing dog.
To get into the posture: Come to hands and knees with your knees hip bone width apart and hands shoulder width apart. Make sure your wrists are directly below your shoulders, and press the floor away from you with your hands. Engage your core and keep your hips up in line with you shoulders, then walk the ball of one foot back until your leg is straight, then follow with the other. Hold for 5 breaths up to one minute.
 |
| Plank pose. |
Helpful hints:
-If you are not able to hold for at least 5 breaths, or if you are collapsing in your low back, try it with the knees down. From hands and knees, walk your knees back a few inches while still keeping the hips up in line with the shoulders. Make sure to keep your core engaged and do not collapse in your low back.
 |
| Plank with knees down. |
 |
| Make sure you don't let go of your core and collapse in your low back! |
-Make sure you do not collapse in your shoulders. Keep pressing the floor away from you with your hands, lifting your torso out of the shoulders.
 |
| Don't collapse into your shoulders! If your head is lower than your shoulders, that's an indicator you are probably collapsing in your shoulders. |
-Make sure you have the correct distance between your hands and feet. Your hands should be directly under your shoulders rather than in front of the shoulders (feet are too far from hands), and your hips should be in line with your shoulders rather than up in the air (feet too close to hands).
 |
| Too much space between hands and feet puts the hands in front of the shoulders rather than under the shoulders. |
 |
| Too little space between hands and feet usually means your bum pokes up in the air, rather than being straight from shoulders to feet. |
Extended Child's Pose (Balasana)
Extended child's pose is a nice rest after plank, and it also gently releases the back and shoulders.
To get into the posture: From hands and knees, bring your knees wide to the edges of your mat and bring your big toes together. Sit down on your keeps, and fold forward and bring your forehead to the mat. Hold for 5-10 breaths.
 |
| Child's pose, plus kitty. :) |
Helpful hints:
-If your head doesn't reach the floor easily, place a blanket or block under your head for support.
 |
| Child's pose with a block under the forehead. |
-If you are not able to fold forward enough to put your head on a block, or if you feel like there is a lot of your body weight resting on your head when you try to reach the floor, then support your entire torso with a bolster.
 |
| Child's Pose with bolster. |
-If you feel pressure on your knees, try it with a blanket between your thighs and calves.
| Child's pose with a blanket between thighs and calves to help decrease the flexion of the knees. |
Downward Facing Puppy
Downward facing puppy is a nice "pre" downward facing dog. It brings your back and shoulders into the flexibility and alignment required for downward facing dog, but without as much strength as downward facing dog requires.
To get into the posture: Come to hands and knees with your knees hip bone width apart (two fist widths). Drop down onto your elbows, and bring your hairline to the floor (where your hair and your forehead meet). Extend your arms forward from the shoulders until the arms are straight, palms pressing into the floor shoulder width apart and elbows off the floor. You should now be in a straight line from your fingertips to your tailbone. This is the same straight line of energy you will want to duplicate in downward facing dog. Hold for 5-10 breaths.
 |
| Downward facing puppy. |
Helpful hints:
-Make sure to keep your hips directly on top of your knees rather than bringing the hips forward.
 |
| Downward puppy with hips forward puts a lot of weight in the head. |
-Make sure not to collapse in your low back. Draw your belly button toward your spine and lengthen your low back.
 |
| Try not to collapse in your low back. |
-Make sure to not relax the arms and let the elbows rest on the floor, but rather press the hands down and forward into the floor and lengthen your tailbone away from the fingertips.
 |
| Downward puppy with arms soft is not as much a prep for downward facing dog, this is more like child's pose. |
Downward Facing Dog, Knees Bent (Adho Mukha Svanasana)
This is the next "pre" downward facing dog, and for many people, beginners and experienced alike, this is the FINAL downward facing dog, as a lack of flexibility or strength may prevent straightening the legs while maintaining safe alignment.
To get into the posture: From hands and knees with knees hip bone width apart and hands shoulder width apart, walk your hands a few inches forward of the shoulders. Press into the hands and send your hips back toward your heels, bring your upper body and arms into a straight line from fingertips to tail, then lift the hips off the heels around 12 inches or slightly more. Keep the knees deeply bent, even perhaps having your ribs touch your thighs. Stay and breathe for 5-10 breaths.
 |
| Downward facing dog with bent knees. |
 |
| And a little bit deeper angle. |
Refining the posture:
-To find the correct distance between your hands and your feet, from downward facing dog, come forward to plank pose, bringing the shoulders directly on top of the wrists and the legs straight. If needed, move your hands and feet to the correct spacing and alignment for plank as described above. Then press back to downward facing dog without moving the hands or feet.
-Make sure you are in a straight line from fingertips to tailbone - a mirror is helpful to check this. Especially make sure your shoulders and chest are in the straight line, rather than above it.
 |
| Shoulders are out of the straight line. |
-Outwardly rotate your upper arm bones. One way to do this is to bend your elbows out like chicken arms, then with the elbows still bent, turn the elbow creases to face the ceiling. From that point, straighten the arms. The elbow creases will not face as far forward as they did with elbows bent, but the upper arm bones will now be a bit outwardly rotated rather than the elbows pointing off to the sides.
 |
| Downward facing dog with elbows bowed out to the sides, upper arm bones are not outwardly rotated. |
 |
| To help find the outward rotation of the upper arm bones, start by doing "chicken arms" with elbows bent off to the side... |
 |
| ...then rotate the elbows so they point down toward the floor, still bent. This outwardly rotates the upper arm bones. This is also called "turbo dog." :) |
 |
| Once you have the elbows pointing down, straighten the arms. |
-Make sure to balance the weight in all parts of your hands, spreading the fingers wide and gripping the mat rather than putting all the weight in the wrists.
 |
| Hands are loose here, meaning all the weight of my upper body is in my wrists, rather than evenly distributed between the finger pads, knuckles and bases of the palms. |
From the previous postures there were a number of indicators that you may want to stick with this bent knee version of downward facing dog for now rather than straightening the legs:
1. If legs up the wall required you to either scoot your bum farther away from the wall than about 12 inches, or if you were unable to bring your arms to the floor overhead.
2. If wall dog required you to walk your hands up the wall, feet away from the wall, or bend your knees to avoid rounding the spine.
3. If you were unable to bring your shoulders and chest down into the line of energy from fingertips to tailbone in downward facing puppy.
Downward Facing Dog
If you are able to keep the alignment of the upper body that you found in downward facing dog with knees bent, you can try straightening the legs.
To get into the posture: from the knees bent variation, maintain the upper body alignment that you had with knees bent, and straighten the knees. Draw the belly button up and in to lengthen and protect the low back. Flex the quadriceps to lengthen the backs of the legs, and press the heels down toward the floor; it does not matter if they actually reach the floor. Hold for 5-10 breaths, then release and rest in extended child's pose.
 |
| Downward Facing Dog. |
Helpful hints:
-As in wall dog, make sure to not collapse into your shoulders, rather keep the chest and shoulders in one long line of energy.
 |
| Downward facing dog with collapsed shoulders. |
 |
| Downward facing dog with shoulders higher than the straight line from fingertips to tailbone. |
-If you want to warm up the hamstrings a bit before trying to straighten the legs, you can bend one knee then the other, alternating. I call this "walking the dog." :)
 |
| Walking the dog is a nice warmup for downward facing dog. |
About today's Featured Yoga Human, Marcy
Practicing yoga since: Spring 2013 - started private yoga sessions with me!
Style of practice: Hatha/vinyasa private sessions 2-3 times per week
___________________________________________________
MEOWTTAKES!
Taking "selfies" of the postures with a 10 second timer made for some interesting kitty photo bombs. I had to crop various kitties out of almost every photo I took... :D
 |
| Case in point - Riddick judges my plank form, and Nala's tail even makes and appearance... |
 |
| "I'm ready for savasana now." :) |
 |
| "We are all bored this photo shoot." |
 |
| "Is it petting time yet?" |
 |
| Merteuil, this is really not your most flattering angle... |
Will be practicing that in Florida and Italy. See you when we get back, hope the BVI's were great!
ReplyDeleteI hope you and Day have a great trip/trips! See you when we are both back! (I'm heading to Vietnam! :) )
DeleteSuper helpful to have the detailed illustrations, thanks Marcy and Justine (and kitties!)
ReplyDeleteSuper helpful to have the detailed illustrations, thanks Marcy and Justine (and kitties!)
ReplyDelete